Customising & running nf-core pipelines
2.1.1. Pipeline setup
In this session we are using Singularity containers to manage software installation for all nf-core/rnaseq tools. Confirm the Singularity cache directory we set in the previous session using the $NXF_SINGULARITY_CACHEDIR Nextflow environmental variable:
echo $NXF_SINGULARITY_CACHEDIR👀 This should match the directory you set in the previous session:
/config/binaries/singularity/containers_devel/nextflow2.1.2. Design your run command
As we learnt in lesson 1.2.4, all nf-core pipelines have a unique set of pipeline-specific parameters that can be used in conjunction with Nextflow parameters to configure the workflow. Generally, nf-core pipelines can be customised at a few different levels:
| Level of effect | Customisation feature |
|---|---|
| The workflow | Where diverging methods are available for a pipeline, you may choose a path to follow |
| A process | Where more than one tool is available for a single step, you may choose which to use |
| A tool | Apply specific thresholds or optional flags for a tool on top of the default run command |
| Compute resources | Specify resource thresholds or software execution methods for the workflow or a process |
All nf-core pipelines are provided with comprehensive documentation that explain what the default workflow structure entails and options for customising this based on your needs. It is important to remember that nf-core pipelines typically do not include all possible tool parameters. This makes it challenging to piece these different sources of information together to determine which parameters you should be using.
The following sections of the documentation can be used to understand what the pipeline is doing and inform your choices about aspects of pipeline-specific customisations:
| Docs | Description | Customisation level |
|---|---|---|
| Introduction | Workflow summary |
|
| Usage | Inputs and options |
|
| Parameters | Available flags |
|
| Output | Files from all processes processes |
|
Challenge
View the parameters for the nf-core/rnaseq workflow using the command line for the specific version 3.11.1
:::
Pipeline structure
👀 Looking at the nf-core/rnaseq pipeline structure provided in the introduction, we can see that the developers have:
- Organised the workflow into 5 stages based on the type of work that is being done
- Provided a choice of multiple methods and specified defaults
- Provided a choice of tool for some steps
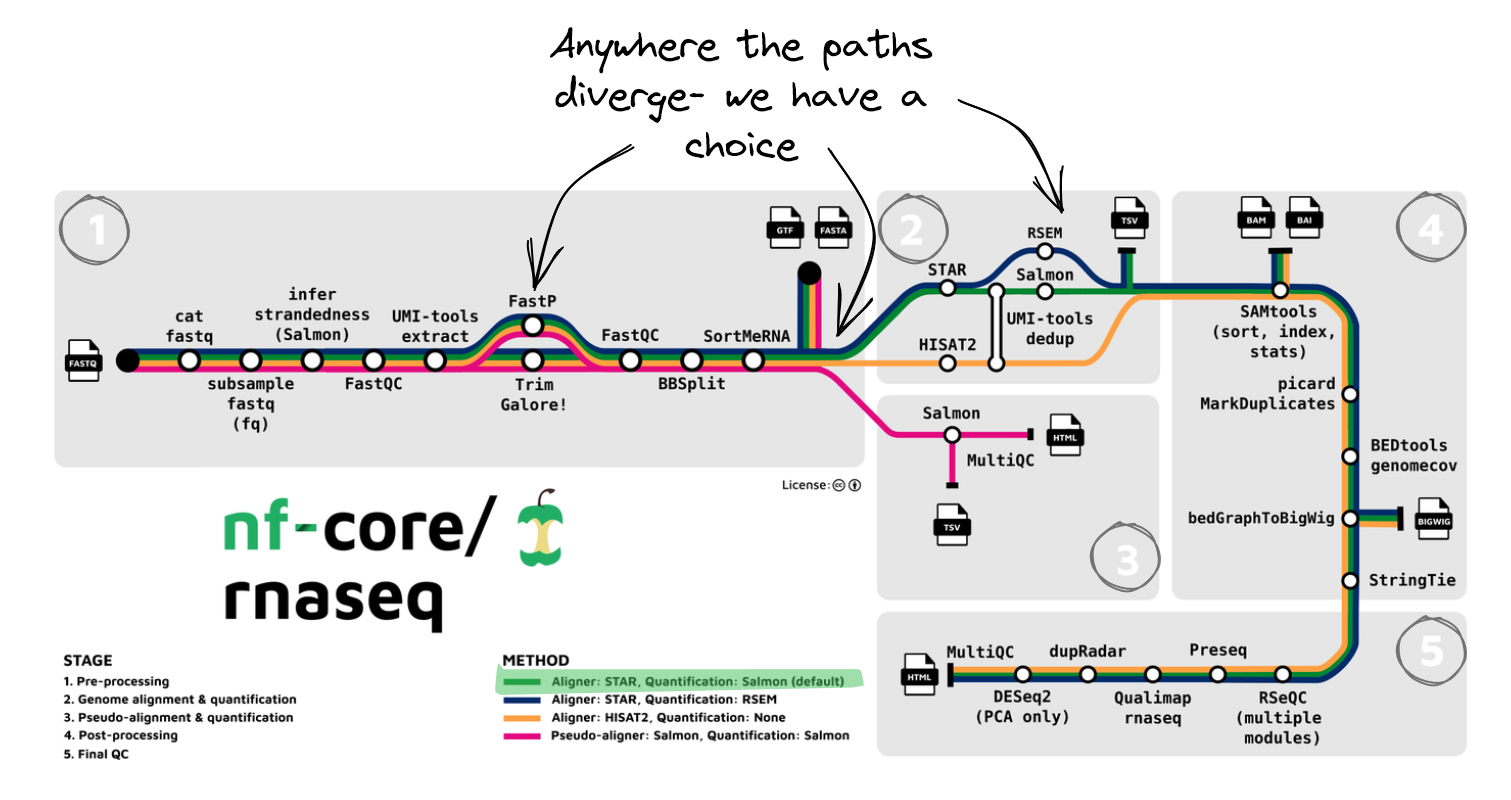
❓ Observing the diagram above, which statement is true regarding the choice of alignment and quantification methods provided by the nf-core/rnaseq pipeline?
a. The pipeline uses a fixed method for read alignment and quantification.
b. Users can choose between several different methods for read alignment and quantification.
c. The pipeline always performs read alignment and quantification using STAR or HISAT2.
d. The choice of alignment and quantification method is determined automatically based on the input data.
The correct answer is b. The nf-core/rnaseq pipeline allows users to choose between pseudo-alignment and quantification or several different methods for genome-based read alignment and quantification.
- a is incorrect because the pipeline is not limited to a single method.
- c is incorrect because while read alignment and quantification using STAR and Salmon are the default method, users can choose pseudo-alignment method.
- d is also incorrect, as the pipeline only accepts fastq files as input and the choice of alignment and quantification method must be specified by the user.
Default pipeline usage
The number and type of default and optional parameters an nf-core pipeline accepts is at the discretion of it’s developers. However, at a minimum, nf-core pipelines typically:
- Require users to specify a sample sheet (
--input) detailing sample data and relevant metadata - Autogenerate or acquire missing reference files from iGenomes ( using the
--genome) if not provided by the user.
You can see the recommended (typical) run command and all the parameters available for the nf-core/rnaseq pipeline by running:
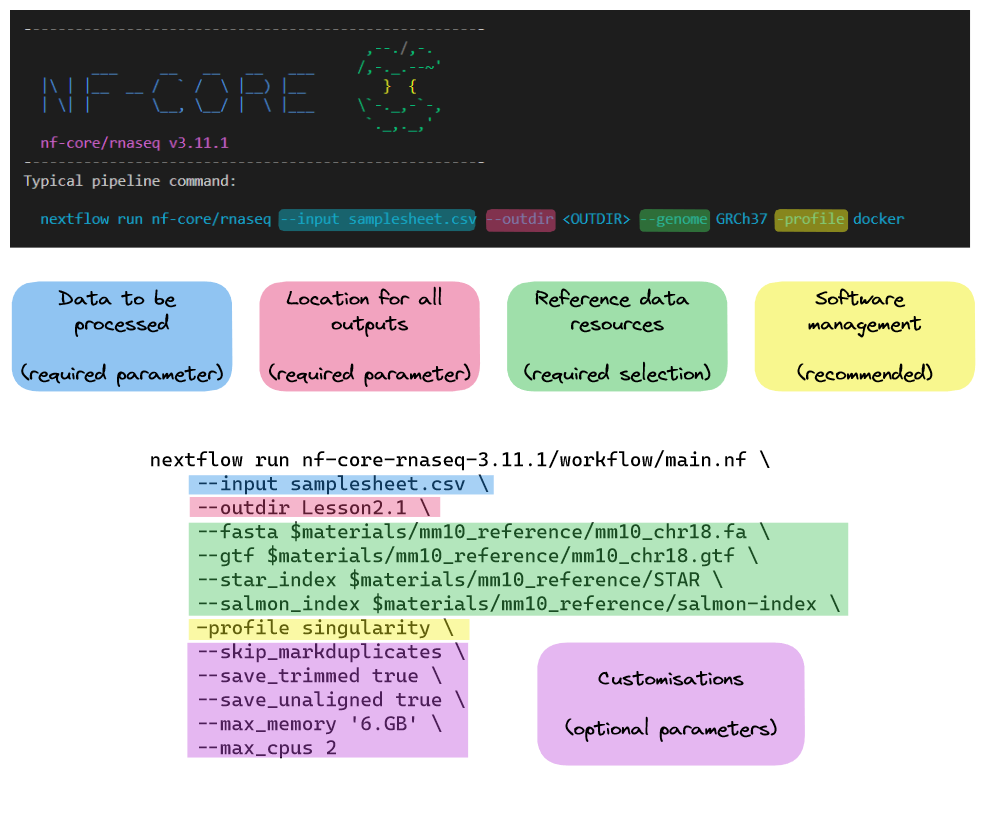
nextflow run nf-core/rnaseq -r 3.11.1 --help The typical or recommended run command for this pipeline is provided at the top of the screen:

It outlines a requirement for a few basic things:
- An input samplesheet
- A location to store outputs
- Relevant reference data
- A software management method
Nextflow-specific parameters use one (-) hyphen, whereas pipeline-specific parameters use two (--). In the typical run command above -profile is a Nextflow parameter, while --input is an nf-core parameter.
Required input: --input
Most of us will need to adjust the default run command for our experiments. Today we’ll be adjusting the typical nf-core/rnaseq run command by:
- Providing our own reference files
- Using the Singularity software management profile, instead of Docker
- Customising the execution of some processes
- Specifying the computing resource limitations of our instances (2 CPUs, 8 Gb RAM)
Our input fastq files (fastq/), reference data (ref/), and full sample sheet (samplesheet.csv) are already available on the cluster. Take a look at the files:
ls -l /data/seqliner/test-data/rna-seqtotal 24
drwxrwsr-x 2 jyu bioinf-core 8192 Sep 14 10:13 ERCC_index
drwxrwsr-x 2 jyu bioinf-core 8192 Sep 14 10:12 fastq
drwxrwsr-x 2 jyu bioinf-core 8192 Sep 14 10:12 refTo make life easier store the path to our test data in a variable.
materials=/data/seqliner/test-data/rna-seqGiven we are only testing the pipeline in this session, we only need to work with a couple of samples. Copy the first two samples from the full prepared sample sheet to a local version of the file:
head -n 3 $materials/samplesheet.csv > samplesheet.csvcat samplesheet.csvsample,fastq_1,fastq_2,strandedness
HBR_Rep1_ERCC,fastq/HBR_Rep1_ERCC-Mix2_Build37-ErccTranscripts-chr22.read1.fastq.gz,fastq/HBR_Rep1_ERCC-Mix2_Build37-ErccTranscripts-chr22.read2.fastq.gz,forward
HBR_Rep2_ERCC,fastq/HBR_Rep2_ERCC-Mix2_Build37-ErccTranscripts-chr22.read1.fastq.gz,fastq/HBR_Rep2_ERCC-Mix2_Build37-ErccTranscripts-chr22.read2.fastq.gz,forwardRequired input: reference data
Many nf-core pipelines have a minimum requirement for reference data inputs. The input reference data requirements for this pipeline are provided in the usage documentation. We can replace the --genome flag in the typical run command with our own files. To see what reference files we can specify using parameters, rerun the pipeline’s help command to view all the available parameters:
nextflow run nf-core/rnaseq -r 3.11.1 --helpFrom the Reference genome options parameters, we will provide our own files using:
--fasta $materials/ref/chr22_with_ERCC92.fa
--gtf $materials/ref/chr22_with_ERCC92.gtf
Notice the message at the bottom of the screen:
!! Hiding 24 params, use --show_hidden_params to show them !!Keep in mind that both this help command and the nf-core parameters documentation hides less common parameters.
Re-run the help command to output the parameters for the nf-core/rnaseq pipeline and including all hidden parameters for version 3.11.1
Run the following:
nextflow run nf-core/rnaseq -r 3.11.1 --help --show_hidden_paramsOptional parameters
Now that we have prepared our input and reference data, we will customise the typical run command by:
- Using Nextflow’s
-profileparameter to specify that we will be running the Singularity profile instead of the Docker profile - Adding additional process-specific flags to skip duplicate read marking, save trimmed reads and save unaligned reads
- Adding additional max resource flags to specify the number of CPUs and amount of memory available to the pipeline.
The parameters we will use are:
-profile singularity--skip_markduplicates true--save_trimmed true--save_unaligned true--max_memory '6.GB'--max_cpus 2
You can see how we’ve customised the typical run command in the diagram below:
2.1.3. Run the pipeline
We will also create a separate output directory for this section.
cd /scratch/users/<your-username>/nfWorkshop; mkdir ./lesson2 && cd $_Now that we have prepared our data and chosen which parameters to apply, run the pipeline:
nextflow run nf-core/rnaseq -r 3.11.1 \
    --input samplesheet.csv \
    --outdir ./lesson2.1 \
    --fasta $materials/ref/chr22_with_ERCC92.fa \
    --gtf $materials/ref/chr22_with_ERCC92.gtf \
    -profile singularity \
    --skip_markduplicates true \
    --save_trimmed true \
    --save_unaligned true \
    --max_memory '6.GB' \
    --max_cpus 2
👀 Take a look at the stdout printed to the screen. Your workflow configuration and parameter customisations are all documented here. You can use this to confirm if your parameters have been correctly passed to the run command:
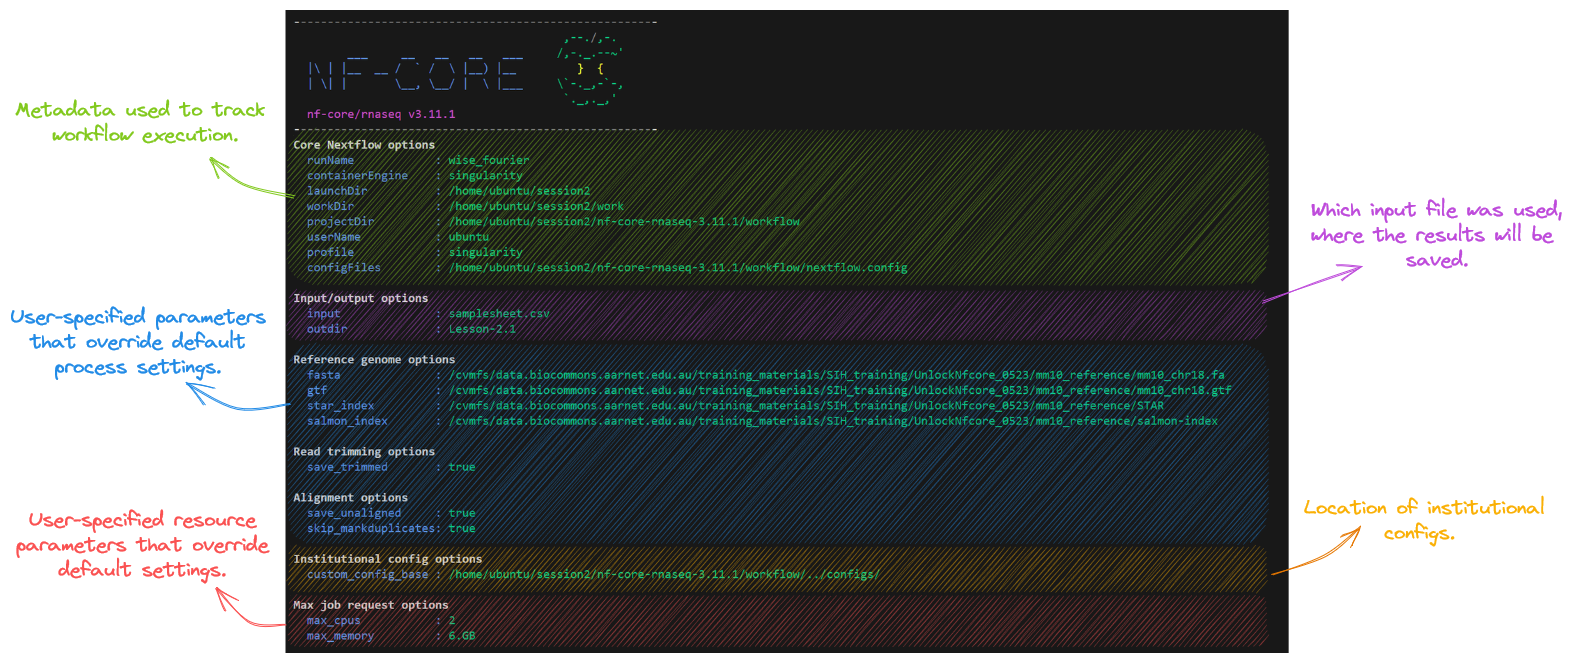
As the workflow starts, you will also see a number of processes spawn out underneath this. Recall from the earlier session that processes are executed independently and can run in parallel. Nextflow manages the data dependencies between processes, ensuring that each process is executed only when its input data is available and all of its dependencies have been satisfied.
To understand how this is coordinated, consider the STAR_ALIGN process that is being run.
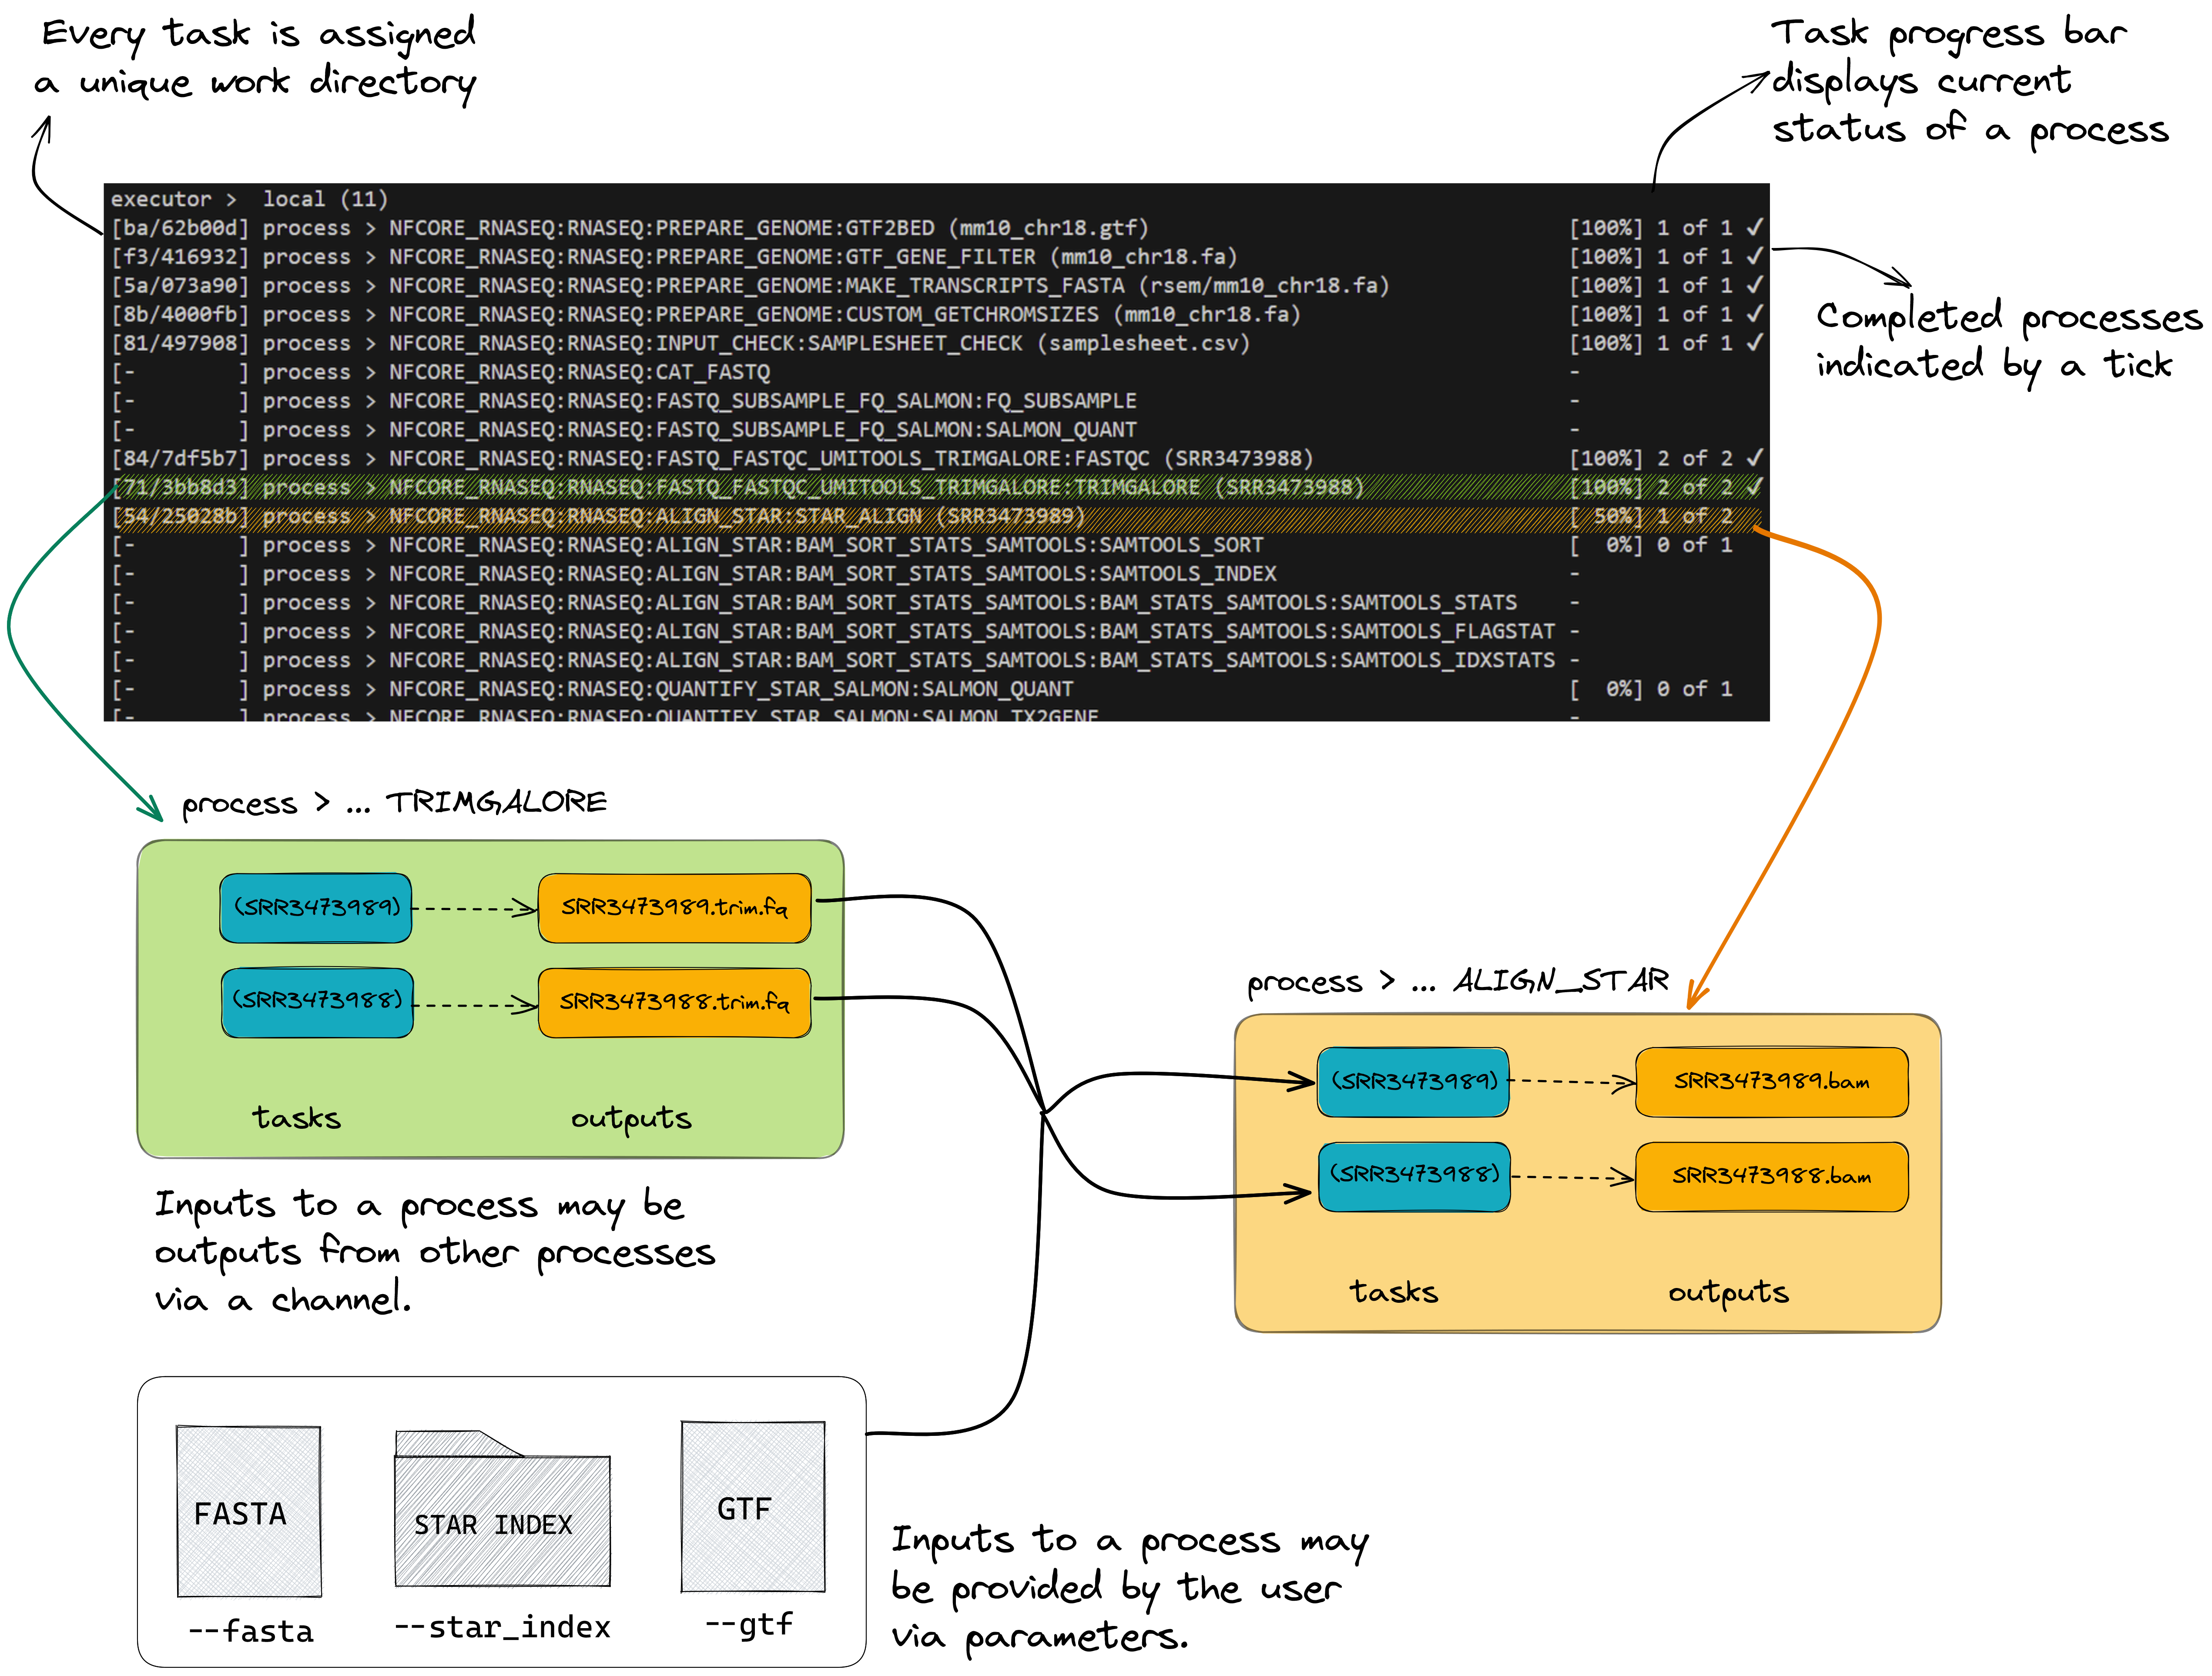
👀 You’ll notice a few things:
- We can see which inputs are being processed by looking at the end of the process name
- When a process starts it progressively spawns tasks for all inputs to be processed
- A single TRIMGALORE process is run across both samples in our
samplesheet.csvbefore STAR_ALIGN begins - Once a TRIMGALORE task is completed for a sample, the STAR_ALIGN task for that sample begins
- When the STAR_ALIGN process starts, it spawns 2 tasks.
Recall from earlier Convert the parameter definitions into a YAML file, workshop-params.yaml, compatible with -params-file
gtf: "/data/seqliner/test-data/rna-seq/ref/chr22_with_ERCC92.gtf"
fasta: "/data/seqliner/test-data/rna-seq/ref/chr22_with_ERCC92.fa"
skip_markduplicates: true
save_trimmed: true
save_unaligned: true
max_memory: "6.GB"
max_cpus: 2
input: "samplesheet.csv"- nf-core pipelines are provided with sensible default settings and required inputs.
- An nf-core pipeline’s Usage, Output, and Parameters documentation can be used to design a suitable run command.
- Parameters can be used to customise the workflow, processes, tools, and compute resources.
In the previous exercises, we have explored how to customise a run with workflow parameters on the command line or within a parameters file. In this lesson we will now look at configuration settings, which manage how the workflow is implemented on your system.
Nextflow’s portability is achieved by separating workflow implementation (input data, custom parameters, etc.) from the configuration settings (tool access, compute resources, etc.) required to execute it. This portability facilitates reproducibility: by applying the same parameters as a colleague, and adjusting configurations to suit your platform, you can achieve the same results on any machine with no requirement to edit the code.
2.1.4. Default nf-core configuration
Together nextflow.config and base.config, define the default execution settings and parameters of an nf-core workflow.
Let’s take a look at these two configuration files to gain an understanding of how defaults are applied. conf/base.config
The generic base.config sets the default compute resource settings to be used by the processes in the nf-core workflow. It uses process labels to enable different sets of resources to be applied to groups of processes that require similar compute. These labels are specified within the main.nf file for a process.
We can over-ride these default compute resources using a custom configuration file.
Then take a few moments to look through workflow/nextflow.config
The nextflow.config file is more workflow-specific, and sets the defaults for the workflow parameters, as well as defines profiles to change the default software access from $PATH to the specified access method, eg Singularity.
We can over-ride these parameters on the command line or with a parameters file, and over-ride the default behaviour of searching for tools on $PATH by specifying a -profile.
Default settings for --max_cpus, --max_memory and --max_time are applied within the nf-core workflow/nextflow.config. These are generous values expecting to be over-ridden with your custom settings, to ensure that no single process attempts to use more resources than you have available on your platform.
Within workflow/conf/base.config, the check_max() function over-rides the process resources if the custom ‘max’ setting is lower than the default setting for that process.

- What are the default settings for CPU, memory and walltime for the
STAR_ALIGNmodule? - How have these defaults been changed from our applied customisations in the previous runs?
To uncover these answers, we need to understand what process label has been assigned to the STAR_ALIGN module.
STAR_ALIGN has the label process_high which has the settings 12 CPUs, 72 GB mem, 16 hrs walltime applied by the default base.config. We have previosuly applied --max_cpus 2 and --max_memory 6.GB, so the check_max() function would have reduced the resources given to the STAR alignment process to 2 CPUs and 6 GB RAM, while retaining the default max walltime.
2.1.5. When to use a custom config file
In our runs so far, we have avoided the need for a custom resource configuration file by:
- Over-riding the default tool access method of
$PATHby specifying thesingularityprofile defined inworkflow/nextflow.config- Without this, our runs for this workshop would fail because we do not have the workflow tools (eg STAR, salmon) installed locally on our VMs
- Over-riding the default values for CPUs and memory set in
nextflow.configwith--max_cpus 2and--max_memory 6.GBto fit within our interactive sessions- Without these parameters, our runs would fail at the first process that requests more than this, because Nextflow workflows check that the requested resources are available before attempting to execute a workflow
These are basic configurations. What if:
- We wanted to increase the resources used above what is requested with process labels to take advantage of high CPU or high memory infrastructures?
- We wanted to run on a HPC or cloud infrastructure?
- We wanted to execute specific modules on specific node types on a cluster?
- We wanted to use a non-default software container?
- We wanted to customise outputs beyond what was possible with the nf-core workflow parameters?
2.1.6. Custom resource configuration using process labels
Capping workflow resources using the max parameters is a bit of a blunt instrument.
To achieve optimum computational efficiency on your platform, more granular control may be required.
If you appled --max_cpus 16 to the nf-core rnaseq workflow, the STAR_ALIGN module would still only utilise 12 CPUs, as this module (as we learnt in 2.1.5) has the label process_high which sets CPUs to 12.
If there were no processes with fulfilled input channels that could make use of the 4 remaining CPUs, those resources would sit idle until the STAR_ALIGN process had completed.
Optimisation for this platform might for example set max_cpus to 8 so two samples could be aligned concurrently, or over-ride the CPU resources assigned to the STAR_ALIGN module to 16.
The next two lessons will demonstrate how to achieve this using custom configuration files that fine-tune resources using process labels to assign the same resources to groups of processes sharing the same label, or withName to target specific processes.
In order to do this, we need to use the process scope. Nextflow has a number of different scopes that can be included in configuration files, for example the params scope you covered in lesson 1.2.5 and applied to your config in lesson 2.1.8.
Within the process scope, we can configure resources and additional arguments for processes.
The following exercise is trivial given the limitations of our interactive session. Consider how this approach can be really powerful when working on HPC or cloud infrastructures, where the executor and queue directives enable you to take full advantage of the compute resources available on your platform.
- 💡 View the file conf/base.config for syntax example
- Add a
processscope inside themy_resources.config - Use
withLabel: <label_name>to set resources for each of the following labels:process_lowprocess_mediumprocess_high
process {
    withLabel: process_low {
        cpus = 2
        memory = 6.GB
    }
    withLabel: process_medium {
        cpus = 2
        memory = 6.GB
    }
    withLabel: process_high {
        cpus = 2
        memory = 6.GB
    }
}
Save the file then re-run the workflow with our custom configuration, setting outdir parameter to lesson2.1.7:
2.1.7. Examine the outputs
Once your pipeline has completed, you should see this message printed to your terminal:
-[nf-core/rnaseq] Pipeline completed successfully with skipped sampl(es)-
-[nf-core/rnaseq] Please check MultiQC report: 2/2 samples failed strandedness check.-
Completed at: 21-Nov-2023 03:31:24
Duration    : 10m 50s
CPU hours   : 0.3
Succeeded   : 67
The pipeline ran successfully, however, note the warning about all samples having failed the strandedness check. We’ll explore that in the next section.
In the meantime, list (ls -la) the contents of your directory, you’ll see a few new directories (and a hidden directory and log file) have been created:
total 356
drwxrwxr-x  6 rlupat rlupat   4096 Nov 22 03:33 .
drwxrwxr-x  7 rlupat rlupat   4096 Nov 22 03:14 ..
drwxrwxr-x  7 rlupat rlupat   4096 Nov 22 03:31 lesson2.1
drwxrwxr-x  4 rlupat rlupat   4096 Nov 22 03:31 .nextflow
-rw-rw-r--  1 rlupat rlupat 283889 Nov 22 03:31 .nextflow.log
-rw-rw-r--  1 rlupat rlupat  66150 Nov 22 03:20 .nextflow.log.1
-rw-rw-r--  1 rlupat rlupat    492 Nov 22 03:15 samplesheet.csv
drwxrwxr-x 69 rlupat rlupat   4096 Nov 22 03:29 work
👀 Nextflow has created 2 new output directories, work and lesson2.1 in the current directory.
The work directory
As each job is run, a unique sub-directory is created in the work directory. These directories house temporary files and various command logs created by a process. We can find all information regarding this process that we need to troubleshoot a failed process.
The lesson2.1 directory
All final outputs will be presented in a directory specified by the --outdir flag.
If you haven’t done so already, check that the run from lession 2.1.3 has completed successfully.
You run should have a summary message similar to below:
-[nf-core/rnaseq] Pipeline completed successfully with skipped sampl(es)-
-[nf-core/rnaseq] Please check MultiQC report: 2/2 samples failed strandedness check.-
Completed at: 11-May-2023 13:21:50
Duration    : 7m 8s
CPU hours   : 0.2
Succeeded   : 66
with the following output directories:
$ ls lesson2.1
fastqc  multiqc  pipeline_info  star_salmon  trimgalore
nextflow run nf-core/rnaseq -r 3.11.1 \
-profile singularity
-c my_resources.config \
-params-file workshop-params.yaml \
--outdir lesson2.1.6 \
-resume👀 Notice that the Max job request options are no longer listed on the run log printed to screen, because we are setting them within the process scope rather than params scope.
The order of priority in which parameters and configurations are applied by Nextflow.
The settings we specify with -c my_resources.config will over-ride those that appear in the default nf-core configurations workflow/nextflow.config and workflow/conf/base.config.
Settings that are not over-ridden by -c <config> or any parameter from params file or provided on the command line will still be set to the nf-core defaults specified in nextflow.config, base.config or main.nf.
To avoid confusion, it is best not to name your custom configuration files nextflow.config!
2.1.8. Custom resource configuration using process names
This exercise will demonstrate how to adjust the resource configurations for a specific process using the withName process selector, using the STAR_ALIGN module as example.
withName is a powerful tool:
- Specifically target individual modules
- Multiple module names can be supplied using wildcards or ‘or’ (
*or|) notation - No need to edit the module
main.nffile to add a process label - Has a higher priority than
withLabel
To utilise withName, we first need to ensure we have the correct and specific executuion path for the module/modules that we wish to target.
Identify the execution path for the STAR_ALIGN module:
- The extended execution path is built from the pipeline, workflow, subworkflow, and module names
- It can be tricky to evaluate the path used to execute a module. If you are unsure of how to build the path you can copy it from the view the modules.conf file on Github
- Note that this does not provide the PIPELINE or WORKFLOW name at the front of the path. You can add these manually (eg
PIPELINEis NFCORE_RNASEQ andWORKFLOWis RNASEQ) but the path withinmodules.configis usually all that is required for specificity within a workflow - If you have previously run the pipeline, you could also extract the complete module execution path from your run log printed to screen, or the execution trace, timeline or report files within
<outdir>/pipeline_info
For STAR_ALIGN within the nf-core/rnaseq workflow, any of the following would be correct and specific:
'NFCORE_RNASEQ:RNASEQ:ALIGN_STAR:STAR_ALIGN'
'.*:RNASEQ:ALIGN_STAR:STAR_ALIGN'
'.*:ALIGN_STAR:STAR_ALIGN'
Continue editing my_resources.config. Inside the process scope, provide the execution path for the STAR_ALIGN module to the withName selector:
process {
  withName: '.*:RNASEQ:ALIGN_STAR:STAR_ALIGN' {
  }
}
Then set CPU to 24 and memory to 96 GB:
process {
  withName: '.*:RNASEQ:ALIGN_STAR:STAR_ALIGN' {
    cpus = 24
    memory = 96.GB
  }
} process {
withLabel: process_low {
cpus = 2
memory = 6.GB
}
withLabel: process_medium {
cpus = 2
memory = 6.GB
}
withLabel: process_high {
cpus = 2
memory = 6.GB
}
withName: '.*:RNASEQ:ALIGN_STAR:STAR_ALIGN' {
cpus = 24
memory = 96.GB
}
}Recall from earlier that nf-core modules use ext.args to pass additional arguments to a module. This uses a special Nextflow directive ext. If an nf-core pipeline does not have a pre-defined parameter for a process, you may be able to implement ext.args.
The inclusion of ext.args is currently best practice for all DSL2 nf-core modules where additional parameters may be required to run a process. However, this may not be implemented for all modules in all nf-core pipelines. Depending on the pipeline, these process modules may not have defined the ext.args variable in the script blocks and is thus not available for applying customisation. If that is the case consider submitting a feature request or a making pull request on the pipeline’s GitHub repository to implement this!
Save the config then resume your run, setting outdir to lesson2.1.8, applying your custom resources from my_resources.config:
nextflow run nf-core/rnaseq -r 3.11.1 \
  -profile singularity \
  -c my_resources.config \
  -params-file workshop-params.yaml \
  --outdir lesson2.1.8 \
  -resume
If your execution path for the STAR_ALIGN module was specified correctly, your run should have died with the error shown below because Nextflow checks that the resources requested are available before executing a workflow:
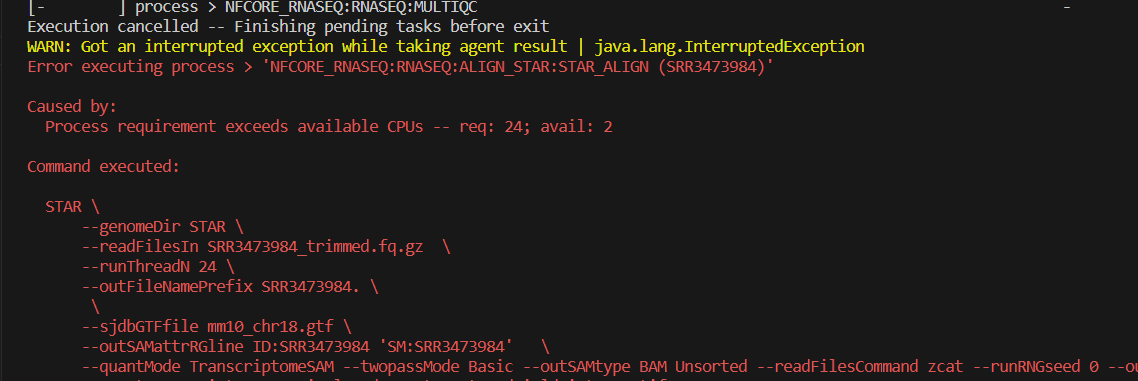
What do you expect would happen to your run if your execution path for the STAR_ALIGN module was not specified correctly?
In this case, our pipeline would complete OK, because the resources for the STAR_ALIGN process have been appropriately set for our interactive session using the process_high label within our my_resources.config.
The directives set within the withName scope would not be applicable, and a warning would be printed, eg
WARN: There's no process matching config selector: .*:RNASEQ:ALIGN_STAR:STARALIGNChange the container used by multiqc to quay.io/biocontainers/multiqc:1.14--pyhdfd78af_0 using the withName scope in your my_resources.config
my_resources.config
process {
    withLabel: process_low {
        cpus = 2
        memory = 6.GB
    }
    withLabel: process_medium {
        cpus = 2
        memory = 6.GB
    }
    withLabel: process_high {
        cpus = 2
        memory = 6.GB
    }
    withName: '.*:MULTIQC' {
        container = "quay.io/biocontainers/multiqc:1.14--pyhdfd78af_0"
    }
}
Run the pipeline
nextflow run nf-core/rnaseq -r 3.11.1 \
  -profile singularity \
  -c my_resources.config \
  -params-file workshop-params.yaml \
  --outdir lesson2.1.8 \
-resume - nf-core workflows work ‘out of the box’ but there are compute and software configurations we should customise for our runs to work well on our compute infrastructure
- nf-core executes by default with
workflow/nextflow.configandworkflow/conf/base.configand has a repository of community-contributed institutional config that ship with the workflow - custom config can be applied to a run with
-c <config_name>, and will over-ride settings in the default config - customisations can be targeted to specific processes using
withLabelorwithName - workflow parameters belong in
-params-file <params_file>and not-c <custom_config>
These materials are adapted from Customising Nf-Core Workshop by Sydney Informatics Hub